Saturday 26 May 2012

Last Yoko Saito Block

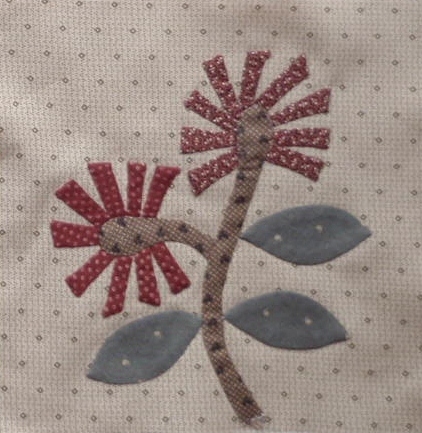
This is the last in my series of blocks from Yoko Saito's book "138 Original Applique Designs".
It is a bit sad to come to the end of the blocks for this quilt.


But the next stage will be fun too. The blocks now need trimming back - I always make applique backgrounds larger than needed so I can trim them back once the applique is done and 
have them completely square.

I have a couple of fabrics put aside for the sashings - one darker than the other, so it will be interesting to see if I go with my original choice - the lighter one. Then there are borders - and of course more applique - yeah! Can't wait to get those sashings on!!


But it will be a while away - sorry.  I have to finish a Playmat for my nephew and his wife's new baby and her cot quilt needs some hand quilting. Plus I am hand quilting some of the Jo Morton Quilt too. The poor old 1800s Antique Sampler is really taking a back seat with the hand quilting - it will get done - one day!!!! That is quite a line up of hand quilting - oh why I don't I like to machine quilt more.

Sunday 20 May 2012

Jo Morton Quilt Top Finished

I had a busy day at the sewing machine yesterday and late today and have got my 
Jo Morton quilt top all in one piece. Each block has been surrounded by triangles like this.


In fact that is how it looks but not how it was done! It was done with alternating blocks 
that looked like this.


But that did take quite a bit of planning and double checking as I sewed them together 
to make sure that each colour was in the correct place to make the quilt centre look like this.


Then it was time for the borders. I wanted those blocks that were missing out on one  triangle surrounding it  to have them back so this is how I did it. I made the border units like this.


Once again a bit of planning regarding which colour went where.

And this is the finished quilt top. With pinned mitred corners! 
Just a bit of hand sewing to do there.


All it needs now is quilting and darkish binding. I am thinking a combination of hand and machine quilting - machine in the ditch of the blocks and hand where you can see it.


Friday 18 May 2012

Last Jo Blocks

The last blocks are made for my Jo Morton Quilt - how exciting is that.


This is the remake of the one that probably fell in the rubbish bin. 


This the final block in the series. Jo has 25 blocks to choose from in her book, 
but I have just made 13. I have designed my own setting - Jo presents 5 ways 
to set your blocks, but of course I have to make my own!

I am planning a whole day in the sewing room tomorrow - how good will that be.
So if everything goes according to plan I will have a quilt top to show by the end of the 
day or at least the weekend. I have a plan for the block setting that I like but the border 
may need a re-plan or a tweak - I just need to see how it all comes together before
making final decisions.

Back soon, Robyn


Tuesday 15 May 2012

Finally More Jo Blocks

I just went searching my Blog posts for when I last finished a Jo Morton Block - oh dear, it 
was the end of March and it is now the middle of May!!!!

And I am paying for it! Over the last few nights I have been taking stock and have 
prepared the next four blocks that I thought I needed. But there were two whoopses in this process. Oh --------!

Anyhow this is one of the blocks that I got prepared and sewn and it is fine.


BUT when I got all the other blocks out to photograph them for you I discover that there 
were two problems.

One - I had lost  a block and I kinda knew this as I looked for it at group one 
day and couldn't find it, but hoped it would turn up. And it hasn't.  It was on the wall at work promoting the Jo Morton Group, but must have fallen off the wall and into the rubbish bin 
below and yes - it must have gone out into the wheelie bin.

So I have re-prepared this one.


Then I prepared this one only to find that I didn't like it and actually I had already done it!!

Oh well there is a message in all this raving - don't leave a project too long or you lose the plot!!

The plot is now restored so I had better get sewing - fast - before I lose it again!


These are the blocks so far. Three to go and then I can get them set. I have  a plan
 that is different from those in Jo's Book and I am looking forward to seeing how
it works. Watch this space!


Sunday 13 May 2012

Sashiko Table Runner

It has been good to finally have a weekend at home - life has just been a little too busy lately.

During the week I have been working on a new sashiko project. For those of you new
to my Blog - welcome. Sashiko is a traditional Japanese hand stitching that was 
originally worked in ecru thread on indigo fabric. Today it is worked in all sorts of colours.


This one is great because the design comes pre-printed on the fabric and washes away later.
It saves so much time and effort in marking on your design. The only problem is that you can only use the lines as a guide as the marked stitches are too big and the spaces between are too long. For example where they have printed 8 stitches I am getting 11. The idea is to get 
4 - 8 stitches per inch.


There are few rules to follow when stitching sashiko. Firstly no stitch should ever touch another stitch. Secondly the stitch should be a little bigger than the space between stitches. You can see on the pre-printed one above that the stitch and the space are about the same.


I am using a chocolate brown sashiko thread on the cream background. This is a long piece of fabric and I have almost done the hand stitching  Then I will add on a border of squares in chocolate coloured woven taupes to complete the table runner.

Sunday 6 May 2012

Chunky Hand Quilting


I haven't done any sewing all week - what with moving the shop and then having a stall at 
The Auckland Quiltmakers' Show over the weekend there just hasn't been time for 
having a needle in my hand. It has been a good busy time, but I am looking forward 
to some serious sewing again.

So instead of a post I thought I would share a bit of a tutorial with you. 
This is the information I shared at the Demo at our  Auckland Modern Quilt Guild 
meeting a month or so ago.

I have become passionate about this big stitch quilting done by hand – I like the 
look of it and it is quick to do.


I use two or three strands of DMC Cotton Embroidery Thread.
 I quilt with a #8 Embroidery needle which allows the thread to go through the eye 
easily and I like the size of it (I hate small, short hand quilting needles at any time!
A hand quilting stitch is a running stitch, but the key is to keep it even – even sized 
stitches with the spaces between the stitches the same size as the stitches themselves.
In general even stitch size is more important than number of stitches per inch.


I try to get three to four stitches up on my needle at one time.
Start with a small knot that you can pull through the top fabric and into the 
batting – knots should never show on the front or the back.
Knot off by pulling the knot into the batting.


You can outline pieced or appliqué areas or create a design anywhere on your 
quilt – use  a removable marking pen to draw your design.
You can see the difference chunky hand quilting makes to a block.


You can use a contrasting strong coloured thread or one that blends into the 
background or as on this quilt both.


Thursday 3 May 2012

Shop Opening Cake

Today a customer came to group with this amazing cake and it was absolutely delicious.
She made it to celebrate the opening of the new shop.


She knows how much I like all things Japanese - in fact she came on one of my trips
to Japan, so she has the 'passion' too.


This is a zoom in on the decoration - sakura - a cherry blossom. You can tell it is cherry blossom because of the little nip out of the petal.


Don't you love the green icing and filling. It really was mouth watering.


Wednesday 2 May 2012

More New Shop Photos

Here are a few more shop photos.


Taken from the other side of the street. It is so much fun having a window to put a display in.


My favourite area - Japanese Taupes - surprise, surprise.


The modern area - looking towards he back of the shop. It is so good to have nice 
wooden floors again.


Tuesday 1 May 2012

New Shop

I have out some photos of the new shop up on the News page of the shop website www.patchworkpassion.co.nz

But here is one  that Mark took yesterday on his phone.


We are so pleased with the whole layout - it is working really well and the girls who 
have worked in the classroom are raving - the light is just so good. This is the first group to 'christen' the new shop classroom first thing on Monday morning.


It dose look very much like the old classroom but there is a little bit more space and lots 
more light. We have double doors opening out which will be great for keeping us cool in summer and the sun comes streaming in during the morning to keep us warm in winter.


I am not sure when some sewing is going to be on my agenda as I have a stall at the The Auckland Quiltmakers' Exhibition this weekend. This is the best little quilt show in Auckland.
I'm not biased or anything (but I am a member of this group!) 

It is on at the Jubilee Building (Old Blind Institute) in Parnell from 10.00am - 5.00pm
 this Saturday and Sunday - maybe you can visit.

Come to think of it I do need to jump on the sewing machine as I have a Cushion to
design and make for Cushion Club next week. Well not quite design from scratch as 
we are doing a Crazy Patch Cushion, but I do need to make one. So off to the sewing 
room I had better go. Back soon. Robyn